When connecting to a Windows device with TeamViewer, the remote session does not start with administrative rights by default when using the QuickSupport module. Because of this, Windows User Account Control (UAC) prompts cannot be controlled during the session.
Windows Authentication lets you sign in with a Windows administrator account to obtain the required permissions. This article explains how to control UAC using Windows Authentication for session-based connections as well as for connections using TeamViewer ID and password.
This article applies to all TeamViewer Remote users.
Prerequisites
Before you start, make sure that:
- The remote device runs either TeamViewer QuickSupport
or
- The remote device runs TeamViewer Host or the TeamViewer full client.
- Note: TeamViewer service must be running, and Windows Authentication must be enabled in the settings (more on this later in the article).
- You have the Windows username and password of an administrator account on the remote device.
Requirements
To connect using Windows Authentication:
- A local Windows account exists on the remote device.
- The Windows account must have administrator rights.
- If the device uses Microsoft Entra ID, the username format needs to be: azuread\username@domain.
How to connect via Windows Authentication
- Using TeamViewer session codes
- Using TeamViewer ID and password
Use this method when you connect via TeamViewer sessions, whether from the full client or the web client.
- From the TeamViewer Remote full client
- From the TeamViewer Remote web client
To QuickSupport on the remote device
- Sign in to your TeamViewer account in the TeamViewer Remote full client.
- Open Remote Support and switch to the Sessions tab.
- Click on + New session.
- Add a session name. Click on the drop-down icon next to Start and select Create for later.
- Share the session code or session link with the remote user.
- On the remote device, the user starts TeamViewer QuickSupport and enters the session code.
- Wait until the session status changes from Waiting for user to Ready.
- Click the three dots (⋮) next to Join session and select Windows Authentication.
- In the authentication dialog, enter the Windows username and password.
- Select the required access control and click Log On.
You are now connected with administrative rights and can control UAC prompts.
To Host or full client on the remote device
If TeamViewer Host or the TeamViewer Full Client runs on the remote device, the following additional steps are required:
- Open the Settings (⚙) on the remote device.
- Go to Advanced settings and click Open advanced settings.
- Navigate to the Security tab.
- Scroll down to Rules for Connections to this computer and enable Windows logon by selecting Allowed for administrators only:
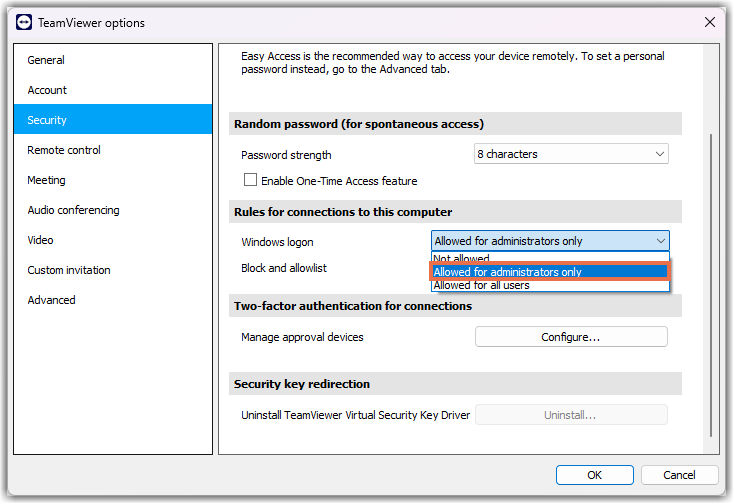
5. Click OK to confirm.
6. In the Settings (⚙) under Device, navigate to General.
7. Enable Start TeamViewer with Windows:

Note: This step is not required when the remote device runs TeamViewer QuickSupport.
After completing the steps above on the remote device, you can establish a connection via the full client by following the instructions below:
- Sign in to your TeamViewer account in the TeamViewer Remote full client.
- Open Remote Support and switch to the Sessions tab.
- Click on + New session.
- Add a session name. Click on the drop-down icon next to Start and select Create for later.
- Share the session code or session link with the remote user.
- On the remote device, the user starts TeamViewer Host or the full client and enters the session code.
- Wait until the session status changes from Waiting for user to Ready.
- Click the three dots (⋮) next to Join session and select Windows Authentication.
- In the authentication dialog, enter the Windows username and password.
- Select the required access control and click Log On.
You are now connected with administrative rights and can control UAC prompts.
To QuickSupport on the remote device
- Sign in at https://web.teamviewer.com/.
- Open Remote Support and switch to the Sessions tab.
- Click on + New session.
- Add a session name. Click on the drop-down icon next to Start and select Create for later.
- Share the session code or session link with the remote user.
- On the remote device, the user starts TeamViewer QuickSupport and enters the session code.
- Wait until the session status changes from Waiting for user to Ready.
- Click the three dots (⋮) next to Join session and select Windows Authentication.
- A new browser tab opens with the Windows authentication dialog.
- Enter the Windows username and password, then click Connect.
You are now connected with administrative rights and can control UAC prompts.
To Host or full client on the remote device
If TeamViewer Host or the TeamViewer Full Client runs on the remote device, the following additional steps are required:
- Open the Settings (⚙) on the remote device.
- Go to Advanced settings and click Open advanced settings.
- Navigate to the Security tab.
- Scroll down to Rules for Connections to this computer and enable Windows logon by selecting Allowed for administrators only:
5. Click OK to confirm.
6. In the Settings (⚙) under Device, navigate to General.
7. Enable Start TeamViewer with Windows:
Note: This step is not required when the remote device runs TeamViewer QuickSupport.
After completing the steps above on the remote device, you can establish a connection via the full client by following the instructions below:
- Sign in at https://web.teamviewer.com/.
- Open Remote Support and switch to the Sessions tab.
- Click on + New session.
- Add a session name. Click on the drop-down icon next to Start and select Create for later.
- Share the session code or session link with the remote user.
- On the remote device, the user starts TeamViewer Host or the full client and enters the session code.
- Wait until the session status changes from Waiting for user to Ready.
- Click the three dots (⋮) next to Join session and select Windows Authentication.
- A new browser tab opens with the Windows authentication dialog.
- Enter the Windows username and password, then click Connect.
You are now connected with administrative rights and can control UAC prompts.
Use this method when you connect using a TeamViewer ID and password instead of a session.
- From the TeamViewer Remote full client
- From the TeamViewer Remote web client
- Start the TeamViewer Remote full client on your device.
- Ask the remote user to start TeamViewer Full Client, TeamViewer Host, or TeamViewer QuickSupport and ask them for their ID.
- Enter the ID under Remote control.
- Click Connect.
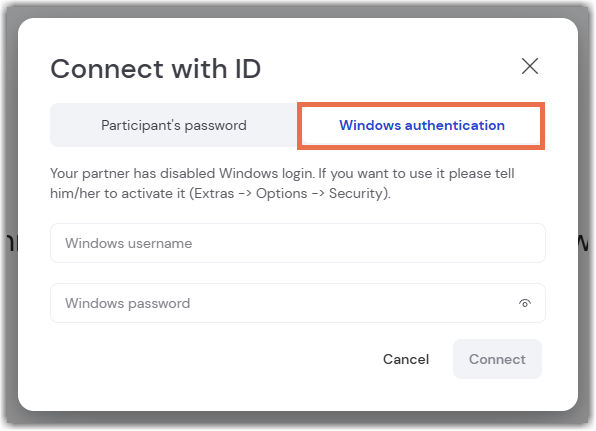
- In the authentication dialog, click Advanced.

6. Set the Authentication method to Windows.

7. Enter the Windows username, the domain if required, and the Windows password.
8. Click Log On.
You are now connected using Windows Authentication and can interact with UAC prompts.
1. Sign in at https://web.teamviewer.com/.
2. Ask the remote user to start TeamViewer Full Client, TeamViewer Host, or TeamViewer QuickSupport and ask them for their ID.
3. Enter the ID under Remote control.
4. Click Connect.
5. A new browser tab opens. In the dialog Connect with ID switch to the tab Windows authentication.