The new TeamViewer Asset Management solution provides detailed overviews of the entire IT infrastructure in one dashboard.
This article applies to all TeamViewer Asset Management customers
Note: This article pertains to the standalone TeamViewer Asset Management service. For articles on TeamViewer's Monitoring & Asset Management (Classic) service, please see here.
What is TeamViewer Asset Management?
TeamViewer Asset Management provides the ability to discover and manage all hardware and software assets on your network. Not only will it locate the computers or mobile devices on the network, but can also categorize any IT or IoT device. This allows the management of software updates and patch deployments from anywhere in the world.

TeamViewer Asset Management interactive demo
To get a feel for the Asset Management services, we have created the following demo that walks through the main components:
How to access TeamViewer Asset Management
TeamViewer's new Asset Management service can be accessed in TeamViewer Remote or via the web app on the Remote Management tab.

How to export asset lists
TeamViewer Asset Management allows for the exporting of all asset lists via Comma Separated Value (CSV) reports. CSV reports can be opened in Excel and many other spreadsheet software applications.
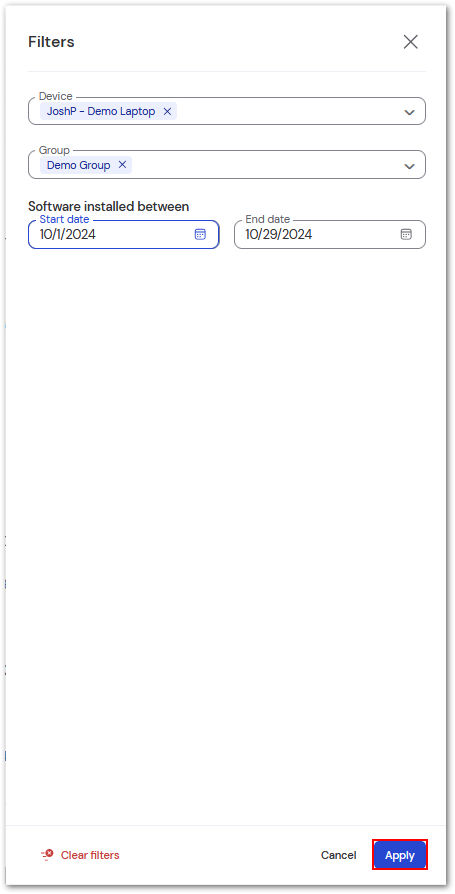
By default, all devices, groups, and hardware are visible in the reports. By utilizing the filter option in the upper right corner of the window, you can reduce the contents of the report to the specific information required.
Current filter options for hardware and software lists include the ability to filter:
- by device
- by group
- by asset
Software also includes the ability to filter:
- Software installed between dates
- Software modified between dates
Once a filter is set, click Apply in the bottom right corner of the window to confirm the changes.
Along with device and group filtration, Patch Management filter options for Missing patches also include the ability to filter:
- by severity
- by operating system
- by type
- by release date
- by end date
Along with device and group filtration, Patch Management filter options for Software deployment also include the ability to filter:
- by software
- by status
- by start date
- by end date
To export an assets list, utilize the filter options to exclude any unnecessary information. Once the desired information is reported, simply click Export in the upper left corner to export the CSV report.
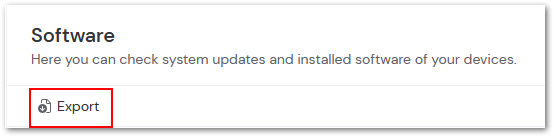
Note: If the report appears jumbled or difficult to read, you may need to add semicolons to your list of delimiters. Please refer to your spreadsheet software for specific instructions on locating this option.
TeamViewer Asset Management is divided into three sections: Network Discovery, Assets, and Patch Management/Software deployment. Please select the corresponding section for more information.
Asset Management Services
TeamViewer Asset Management is broken into the following sections:
- Network Discovery
- Assets
- Vulnerabilities
- Missing patches
- Software deployment
- Network Discovery
- Assets
- Vulnerabilities
- Missing patches
- Software deployment
Network Discovery
Network Discovery is a powerful tool that enables IT administrators to gain real-time visibility into their networks' digital landscape. Using TeamViewer Asset Management endpoints to scan their networks, it reports a comprehensive list of all connected assets, allowing admins to maintain a thorough, always up-to-date overview of every device in play.
Network Discovery can uncover a diverse array of devices, including:
- Mobile devices: Not just phones and tablets, but unique gadgets like eReaders, wearables, and even smart glasses.
- Office essentials: Critical office equipment such as printers and servers, ensuring everything is accounted for.
- Network infrastructure: From routers and switches to network-attached storage (NAS), Network Discovery creates a map of your network’s backbone.
- IoT marvels: From Point-of-Sale systems to Raspberry Pis, Network Discovery captures smaller devices driving modern operations.
- Smart home tech: Even in work-from-home environments, it can identify connected lights, gaming consoles, fridges, solar panels, and more, keeping hybrid networks secure and well-monitored.
And that’s just scratching the surface! Network Discovery allows administrators to track assets and anticipate potential security needs, allocate resources more effectively, and keep their networks optimized and secure. Whether managing a large office, a hybrid workspace, or specialized networks, Network Discovery is the key to gaining complete oversight and peace of mind. For a full list of supported network devices, please see the following link:
How to enable Network Discovery
To begin the process, navigate to the Network Discovery tab underneath Asset Management. In the upper right corner, select Enable scanning device.

Select the desired scanning device from the list and then click Enable to begin discovery.
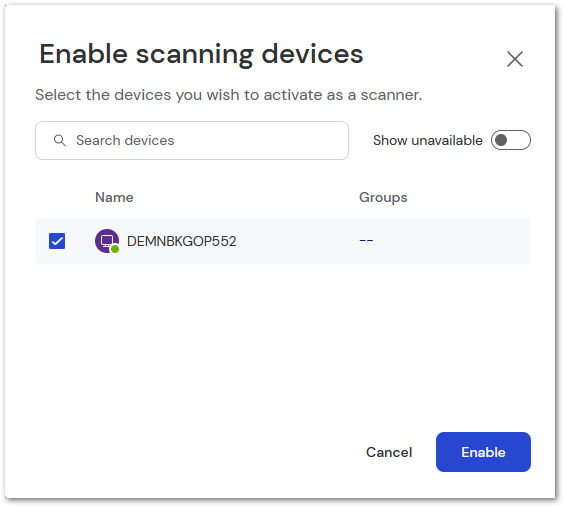
Note: Network Discovery only scans the devices' current subnet. It is recommended to designate only one device per subnet to prevent conflicts or unnecessary network traffic.
A confirmation of successful activation will appear in the upper right corner.

Once activated, the scanning will begin. Depending on the devices on the subnet, there may be a delay in the devices loading into the list. However, once located, they will automatically appear.
Devices that appear will share the following information:
- Device Type
- IP address
- MAC address
- Manufacturer
- OS
- Model
- OS version
- First found date
- Last scan date
Note: Not all fields will be available for all device types.
Assets
TeamViewer Asset Management offers organizations an efficient way to track and manage their entire array of hardware and software assets. It creates a comprehensive inventory that includes a wide range of devices, from computers and laptops to servers and mobile devices, as well as all relevant software licenses.
Within Asset Management, all details of these assets are accessible on the Assets tab. Users are presented with the Hardware Assets device list when accessing the Assets tab, which consolidates essential information for each endpoint. This includes key identifiers and details for easy reference and management:
- Device Name: A unique identifier for quick recognition.
- Device Type: Classification of the device, whether a desktop, laptop, server, or mobile.
- Model and Manufacturer: Details about the device's make and model for easy specification and support tracking.
- Group: Indicates the organizational group or department associated with each device, helping streamline access management.
- IP Address and MAC Address: Network-specific identifiers supporting device location and network security.
- Warranty End Date: Currently available for Lenovo, Dell, Toshiba, and Fujistu devices.
This unified view allows IT administrators and asset managers to monitor and document every piece of hardware and software and gain insights for optimizing IT resources and maintaining license compliance.
How to view a specific device's assets
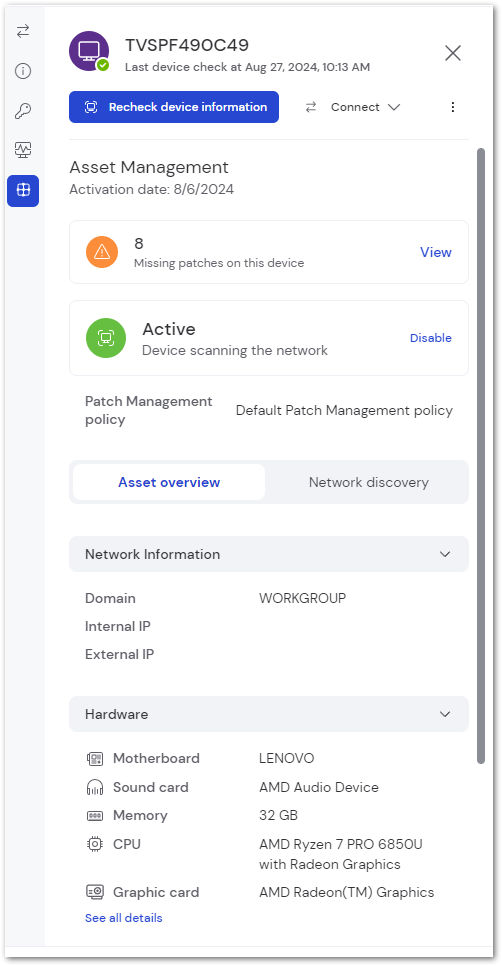
The recommended method to access a specific device's asset lists is through the device drawer. This is done by clicking the device name on the Device tab of TeamViewer Remote, or within any of the asset device lists. The drawer will open on the right; select the tab with square crosshair to access the Asset Management information for the device.

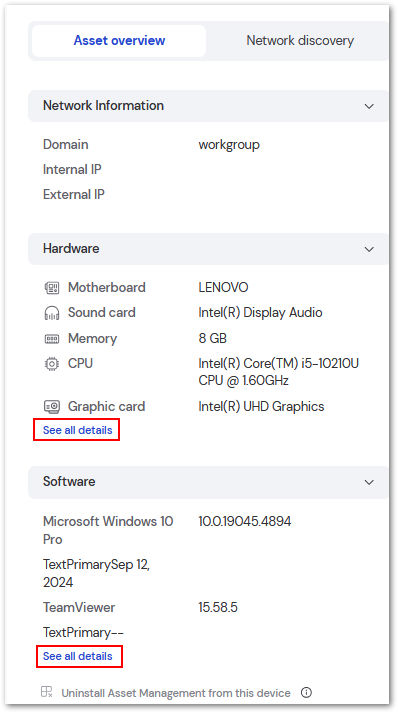
The Asset Management tab on the device drawer provides not only the Hardware and Software asset lists but also the Network Information (Domain and Internal/External IP) and available patches for the specific device. You can also force a recheck of the assets by using the blue Recheck device information button at the top.
How to view a device's full Hardware and Software assets list
The Hardware and Software assets for any endpoint can be accessed via the device drawer by selecting See all details at the bottom of each section.
For a complete list of Hardware and Software assets, please see below:
- Hardware Assets
- Software Assets
Hardware Assets
Hardware Assets can be found on the Hardware tab, the default landing point when accessing Assets. Information about the most important hardware assets is available in the device drawer, which can be opened by selecting a device in a device group.
The following information is available in Hardware Assets:
MOTHERBOARD
- Model of the Motherboard
- Manufacturer of the Motherboard
SOUND CARD
- Sound card number (if multiple installed)
- Type of sound card (usually includes manufacturer name)
MEMORY
- Memory stick number (if multiple installed)
- Size (GB) - Type (such as DDR4) - Manufacturer
CPU
- Manufacturer, type, and GHz
GRAPHIC CARD
- Manufacturer, type, and MB
HARD DISK
- Manufacturer
- Model
- Size
LOGICAL DRIVE
- Drive letter, Used space (GB), and Available (free) space
MONITOR
- Manufacturer
USB
- USB Connection number (if multiple)
- Details of connection
- Manufacturer
Warranty Details
- Warranty number (if multiple)
- Warranty purchase country
- Warranty End date
- Warranty Services
Network Details
- Name
- Domain
- DNS name
- FQDN
- MAC address
- Internal IP
- External IP
- Subnet
- Gateway
Note: It is also possible to manually add Financial Information (PO number/date, purchase date, cost center, Vendor name, Invoice number, and acquisition type) for devices.
Software Assets
Like hardware assets, the Software asset tab provides a comprehensive inventory with detailed information about each application installed across all endpoints. The following information is provided within the device list:
- Name of the application
- Version installed
- Publisher of application
- Release date
- Installation date
- Group
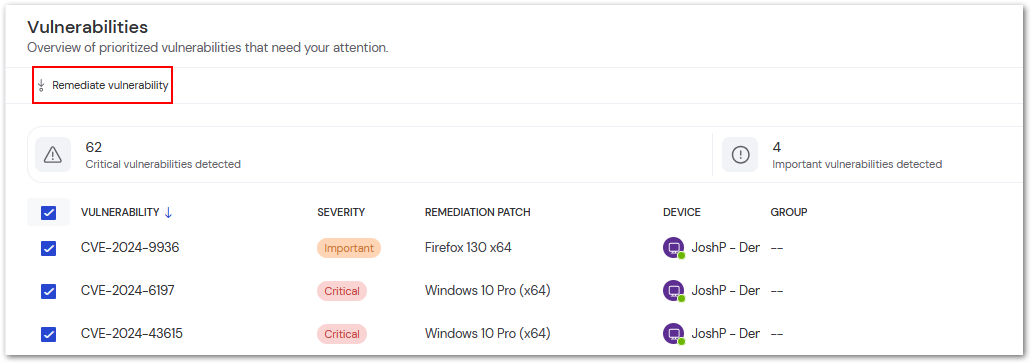
Vulnerabilities
The Vulnerabilities tab provides quick insight into all unpatched CVE's currently missing from devices. The following information is provided for each vulnerability:
- Related CVE
- Severity
- Remediation Patch
- Device
- Group
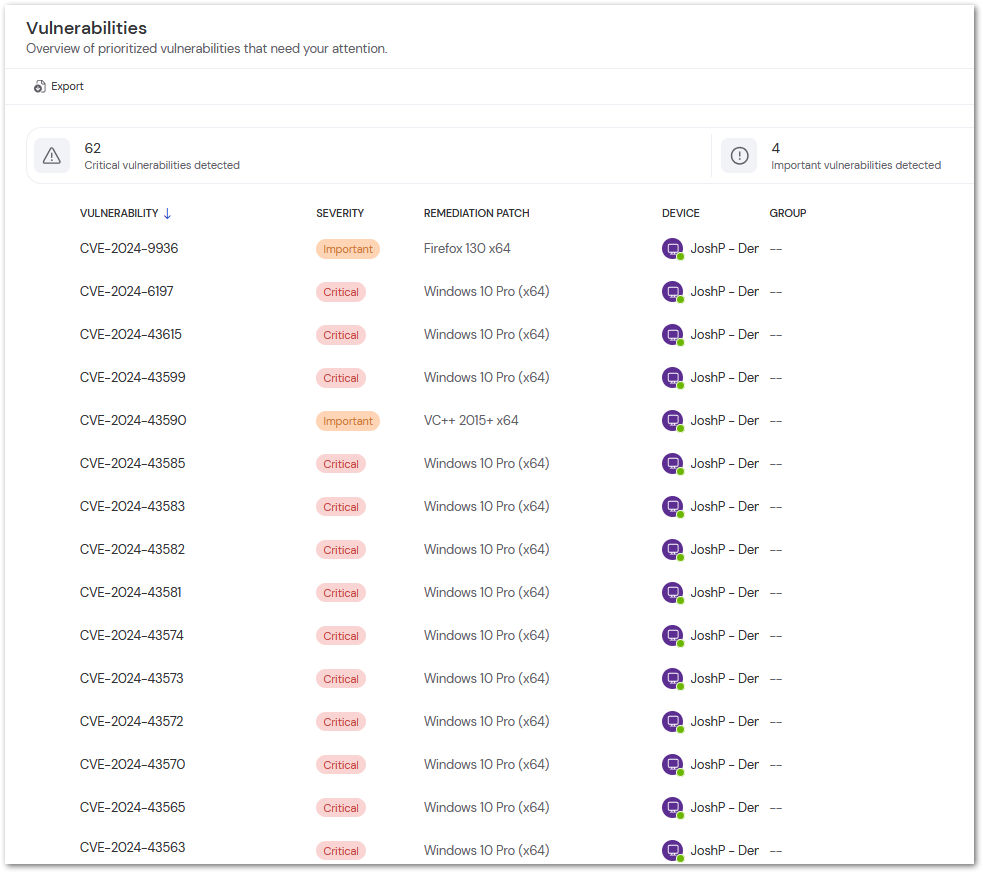
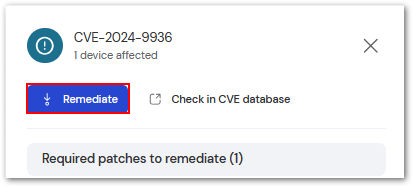
Selecting the related CVE will open the Vulnerability drawer. Selecting Patch Details will provide even more insight into the vulnerability.
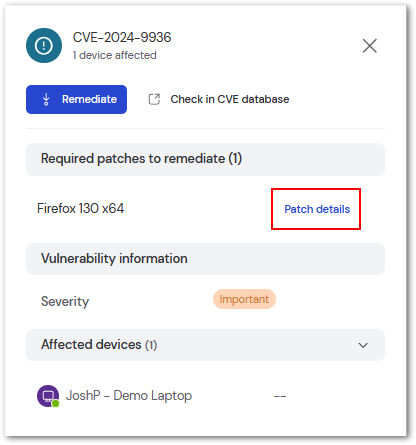
The following information is available for each Vulnerability:
- Severity
- Type
- Bulletin ID
- KB
- CVE
- OS
- Patch size
- Description
How to remediate Vulnerabilities
TeamViewer Asset Management provides multiple options to remediate vulnerabilities. To remediate all or multiple vulnerabilities, check the box next to each CVE and select Remediate vulnerability at the top of the page.
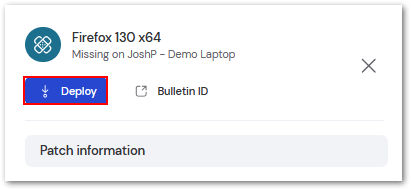
In the vulnerability or patch drawer of individual vulnerabilities, select the Remediate or Deploy button at the top of the drawer to push the single patch through.
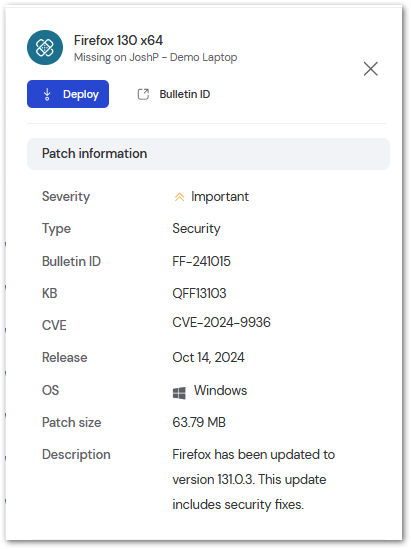
Missing Patches
The Missing Patches tab provides a quick run-down on all currently available software updates.
This includes the total amount of Critical and Important patches, Security patches, and patches released in the last 30 days.
Clicking on the name of any patch displays more information regarding the patch itself in the Device drawer.
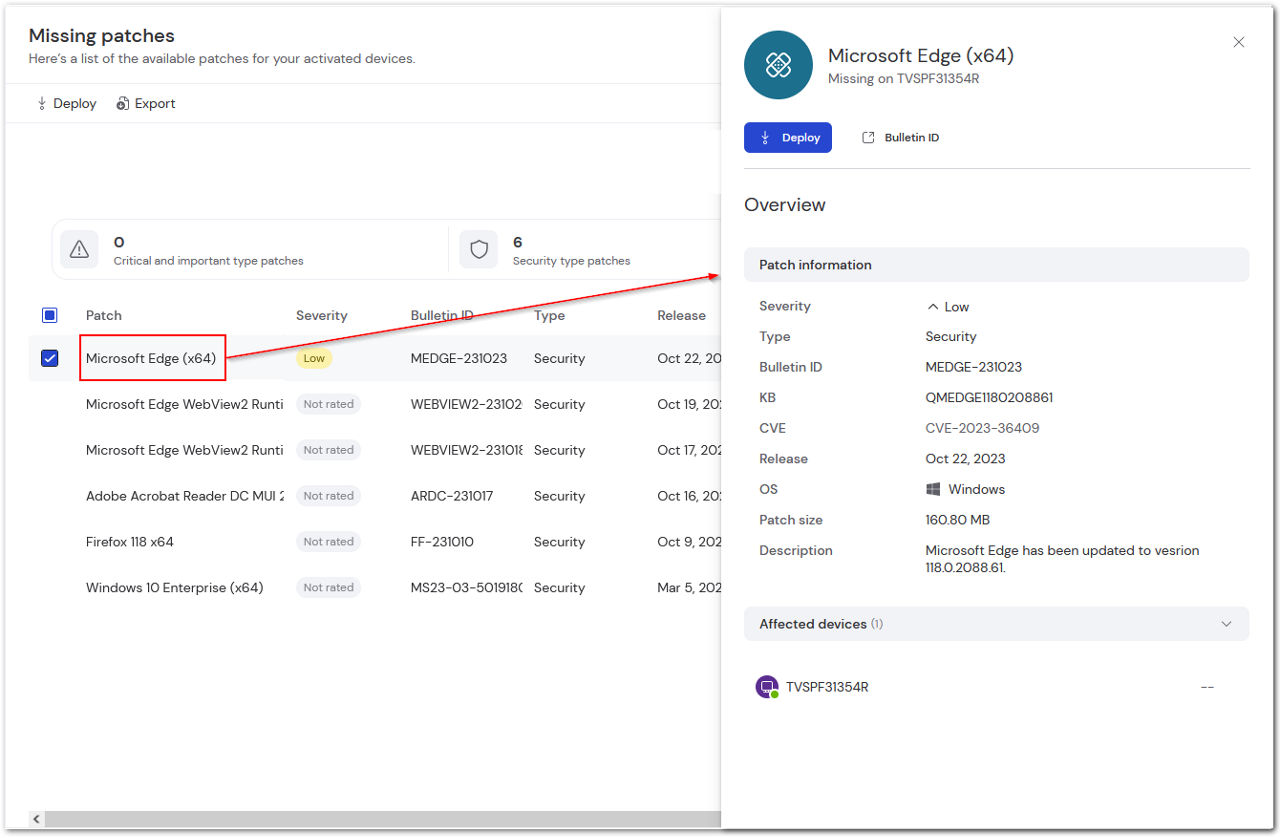
For each individual patch, the following information is provided:
Severity
- Critical | Important | Low | Not Rated
Type
- Security | non-security
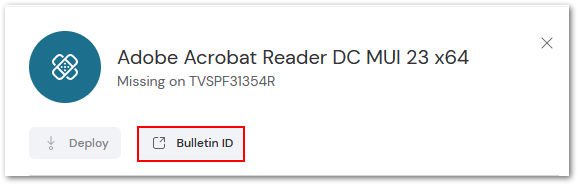
Bulletin ID
- Patch ID as provided by the vendor
Hint: The Bulletin ID is also a link to the changelog, which is provided by each software vendor. To access it, click the Bulletin ID option at the top of the device drawer.
Related KB/CVE links
- Referred CVE/security or KB documentation related to the patch
Release
- Date of release for the patch
OS
- Current operating system on the device
Description
- Additional details about the patch
Affected Device(s)
- Name of the device(s) requiring the patch
Software Deployment
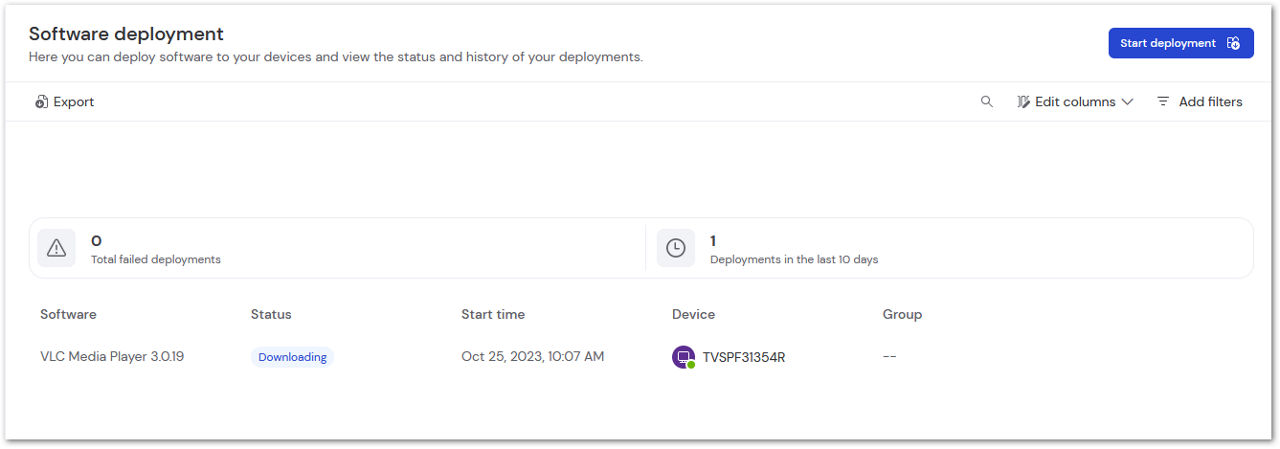
The Software Deployment feature provides the ability to deploy desired software to all available endpoints in only a few steps.
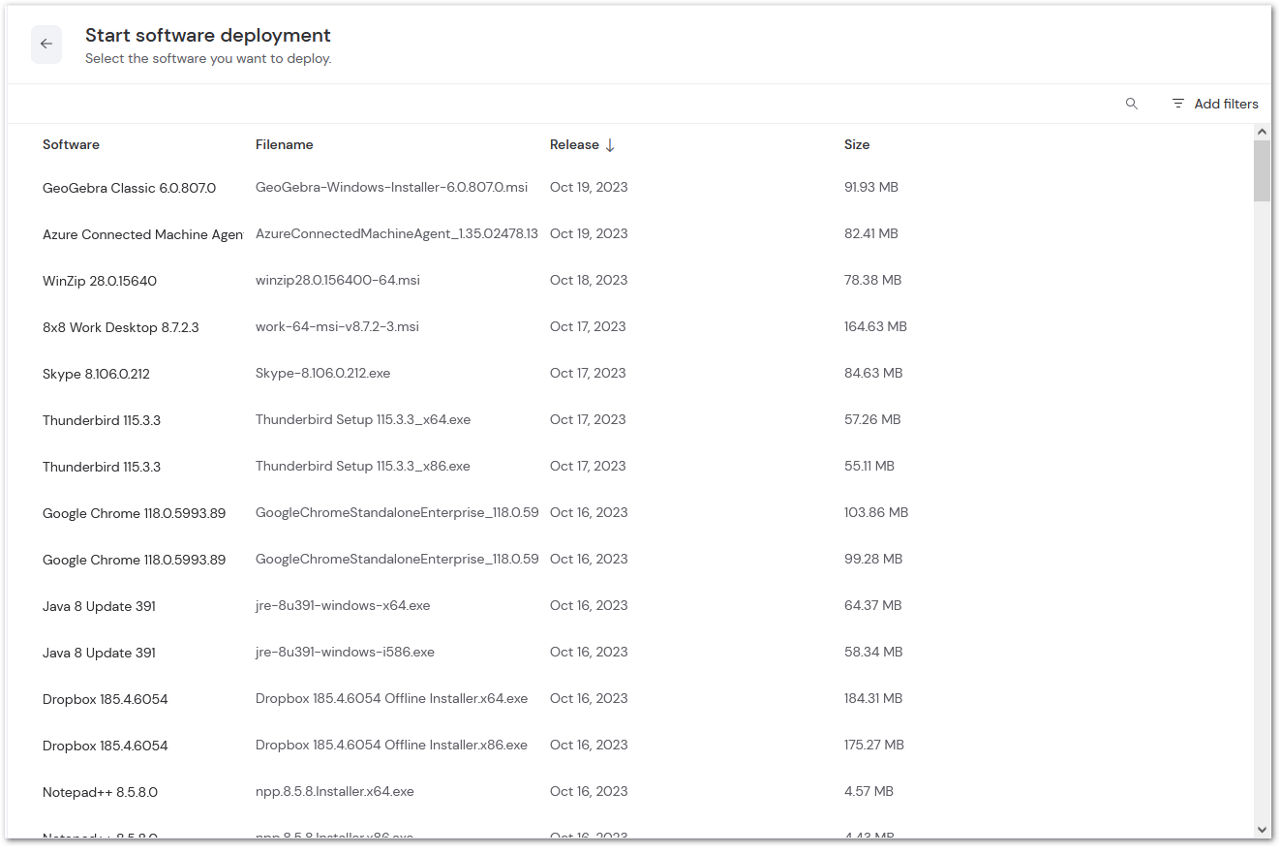
Once the desired software and devices are selected, the Software deployment tab will provide current status updates regarding the requested deployments. This information includes:
- Software name
- Status of deployment
- Start time
- Device name
- Group
The device drawer can be produced by clicking the name of the software being deployed, which provides even more information regarding the deployment:
Software information
- Release date
- Size of application
Deployment information
- Status of deployment
- Start time
- End time
Download details
- Start time
- End time
- Duration
Installation details
- Start time
- End time
- Duration