Proper configuration of the Endpoint Protection services powered by ThreatDown is essential to getting the most out of them. The following article discusses the settings sections and the best configuration options where possible.
This article is for all TeamViewer Endpoint Protection customers.
The settings are broken down into the following sections:
- Scan schedules
- Groups
- Exclusions
- Users
- Scan schedules
- Groups
- Exclusions
- Users
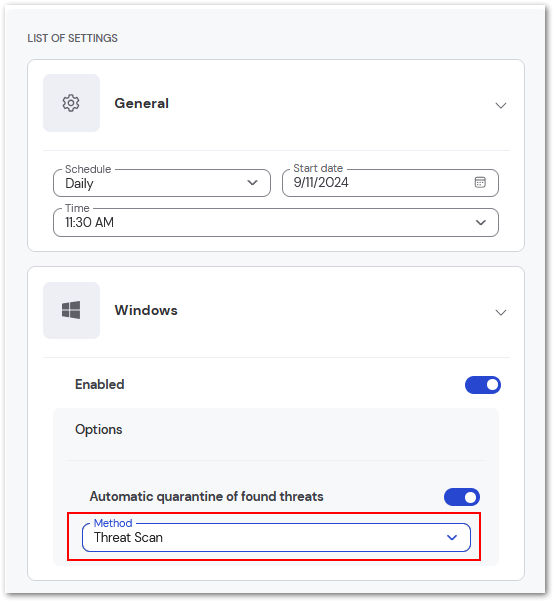
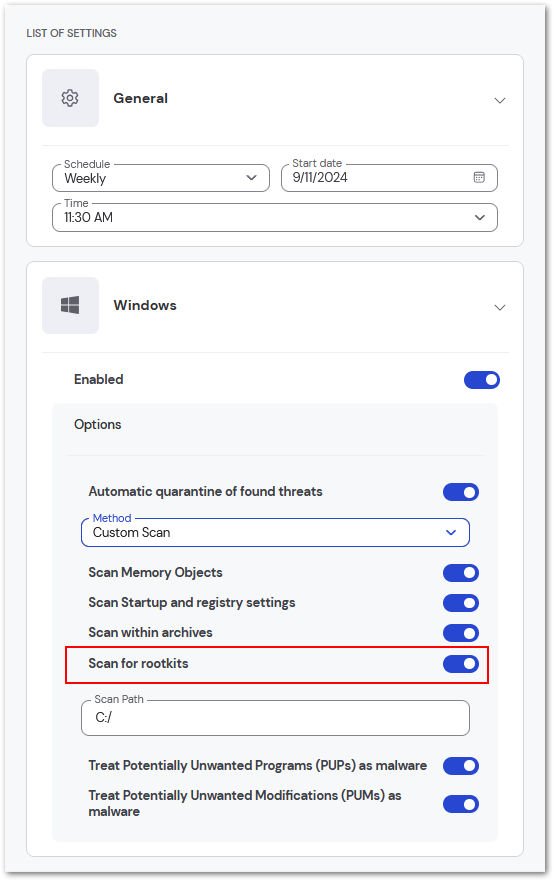
Scan schedules
Scheduling scans for all endpoints is essential for protecting all systems from various threats, such as malware and viruses. As new threats emerge constantly, regular daily scans ensure that any harmful files located in higher-risk areas of systems, such as temporary files and downloads, are constantly checked and are caught early. Weekly scans alongside daily scans can take a deeper dive into the system, as more thorough scans can utilize more resources.
Scan options
- Windows
- macOS
- Linux
Automatic quarantine of found threats: If activated, all potential or confirmed threats will be automatically quarantined. Isolating the files right away prevents any harmful actions from occurring before potential removal. When a threat is quarantined, you can rest assured the potential file is isolated while you investigate further to determine necessary actions.
Method
- Custom scan
- Hyper scan
- Threat scan
Scan Memory Objects: Scans all memory allocated by operating system processes, drivers, and other apps.
Scan startup and registry settings: This scans all executable files or modifications initiated at computer startup and any configuration changes made to the Windows registry.
Scan within archives: Scans of archive file types, such as zip, 7z, rar, cab, and msi, are scanned up to two levels deep. Password-protected archives cannot be tested.
Scan for rootkits: Rootkits are files stored on your computer's local disk drives that are invisible to the operating system and may influence system behavior.
Scan path: The file path of the drive/folders to scan.
Treat Potentially Unwanted Programs (PUPs) as malware: You can choose how to treat Potentially Unwanted Programs (PUPs) if detected.
Treat Potentially Unwanted Modifications (PUMs) as malware: This option allows you to choose how PUMs are treated if detected.
A Hyper Scan is a quick scan that detects and cleans threats. If a Hyper Scan finds any threats, run a Threat Scan to check for threats at a deeper level.
Hyper Scans check the following:
- Memory Objects: Memory allocated by operating system processes, drivers, and other applications.
- Startup Objects: Executable files and/or modifications made during computer startup.
Threat Scans detect the most common threats by scanning conventional locations on an endpoint where threats can occur. Threat Scans use heuristic analysis, a technique that looks for certain malicious behaviors in files that Nebula hasn't seen before.
Threat Scans check the following on your endpoints:
- Memory Objects: Memory allocated by operating system processes, drivers, and other applications.
- Startup Objects: Executable files and modifications made during computer startup.
- Registry Objects: Configuration changes made to the Windows registry.
- File System Objects: Files that may contain malicious programs or harmful code snippets.
Automatic quarantine of found threats: If activated, all potential or confirmed threats will be automatically quarantined. Isolating the files right away prevents any harmful actions from occurring before potential removal. When a threat is quarantined, you can rest assured the potential file is isolated while you investigate further to determine necessary actions.
Treat Potentially Unwanted Programs (PUPs) as malware: You can choose how to treat Potentially Unwanted Programs (PUPs) if detected.
Use the drop-down menu to select either Ignore detections, Warn user about detections, or Treat detections as malware.
Automatic quarantine of found threats: If activated, all potential or confirmed threats will be automatically quarantined. Isolating the files right away prevents any harmful actions from occurring before potential removal. When a threat is quarantined, you can rest assured the potential file is isolated while you investigate further to determine necessary actions.
Recommended scan setup
We recommend the following scans at the minimum to ensure all endpoints are properly protected:
- Daily scan
- Weekly scan
Select Daily from the schedule drop-down in General. Under Windows, select Threat Scan from the method drop-down.
Select Weekly from the Schedule drop-down. Set the Method to Custom Scan, and turn on Scan for rootkits.
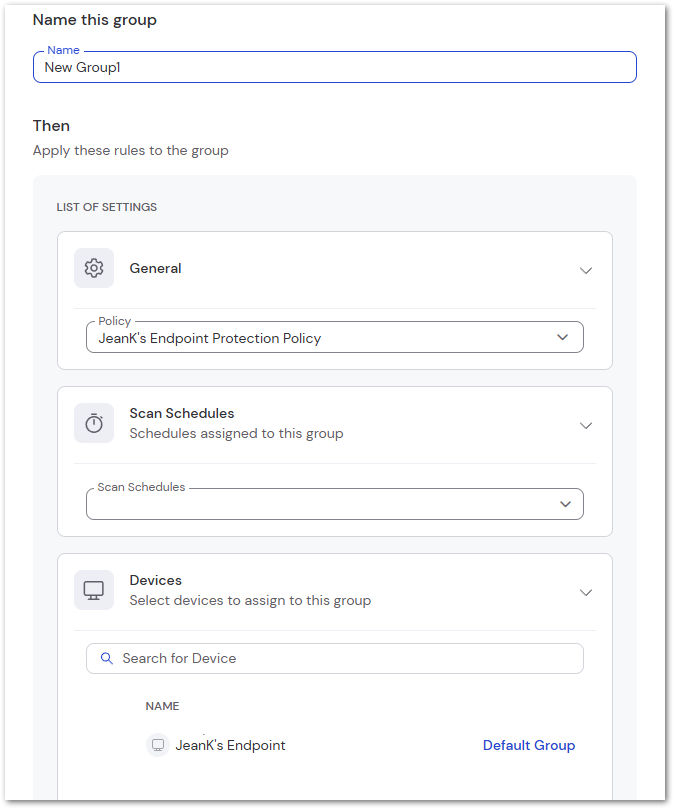
Groups
Groups allow you to take devices outside the same Device Group or location and apply standard rules, such as Policy and Scan Schedule, to them, eliminating the need for duplication.
How to create a group
To create a group, select +Add group from the top menu. Select the desired policy, scan schedules, and select devices to add to the group and save.
Exclusions
Exclusions allow certain known files, paths, or locations to be exempt from scans and protection.
Types of exclusions
Users
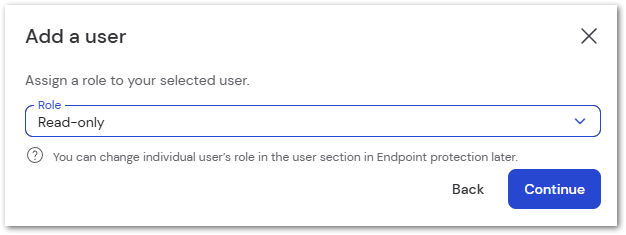
Adding users from your Company Profile allows your team to interact or view reports and alerts from Endpoint Protection. There are two levels of access:
- Read Only: Can view the alerts and reports but cannot perform any actions.
- Manager: Can view and interact with alerts, reports, and other Endpoint Protection services.
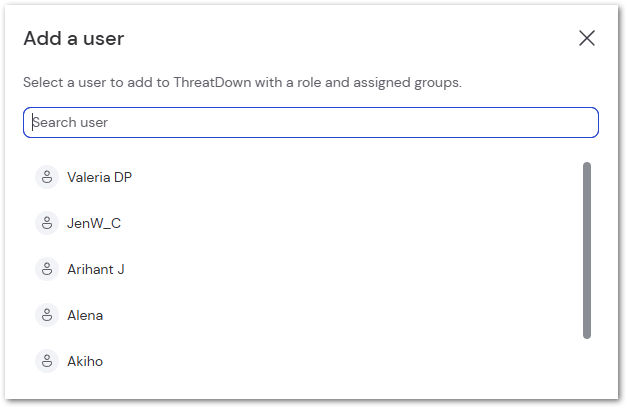
How to add a user
To add a user to Endpoint Protection, select +Add user from the top menu.
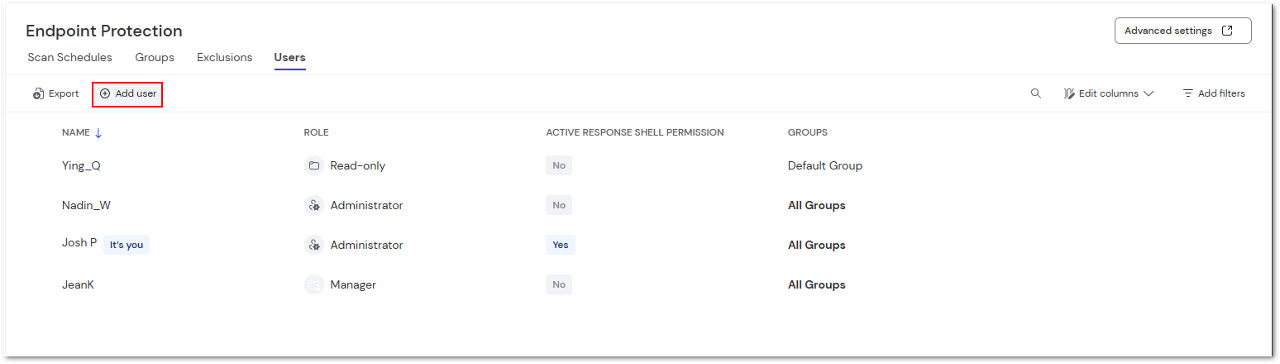
Select the desired user and then the access level and groups the user should have access to. Alternatively, you can assign the user to all Malwarebytes groups, including future ones created.